Monthly Archives: August 2017

Origami Duck – Focus On Angles

I ended up having this go over two days and looking back I’m very glad I did.  Here are my notes for day one of the lesson which is where they folded the model.  For specific folding instructions – go over to georigami.com and watch Dave and I fold the duck.  I recommend watching the “For Educators” video.

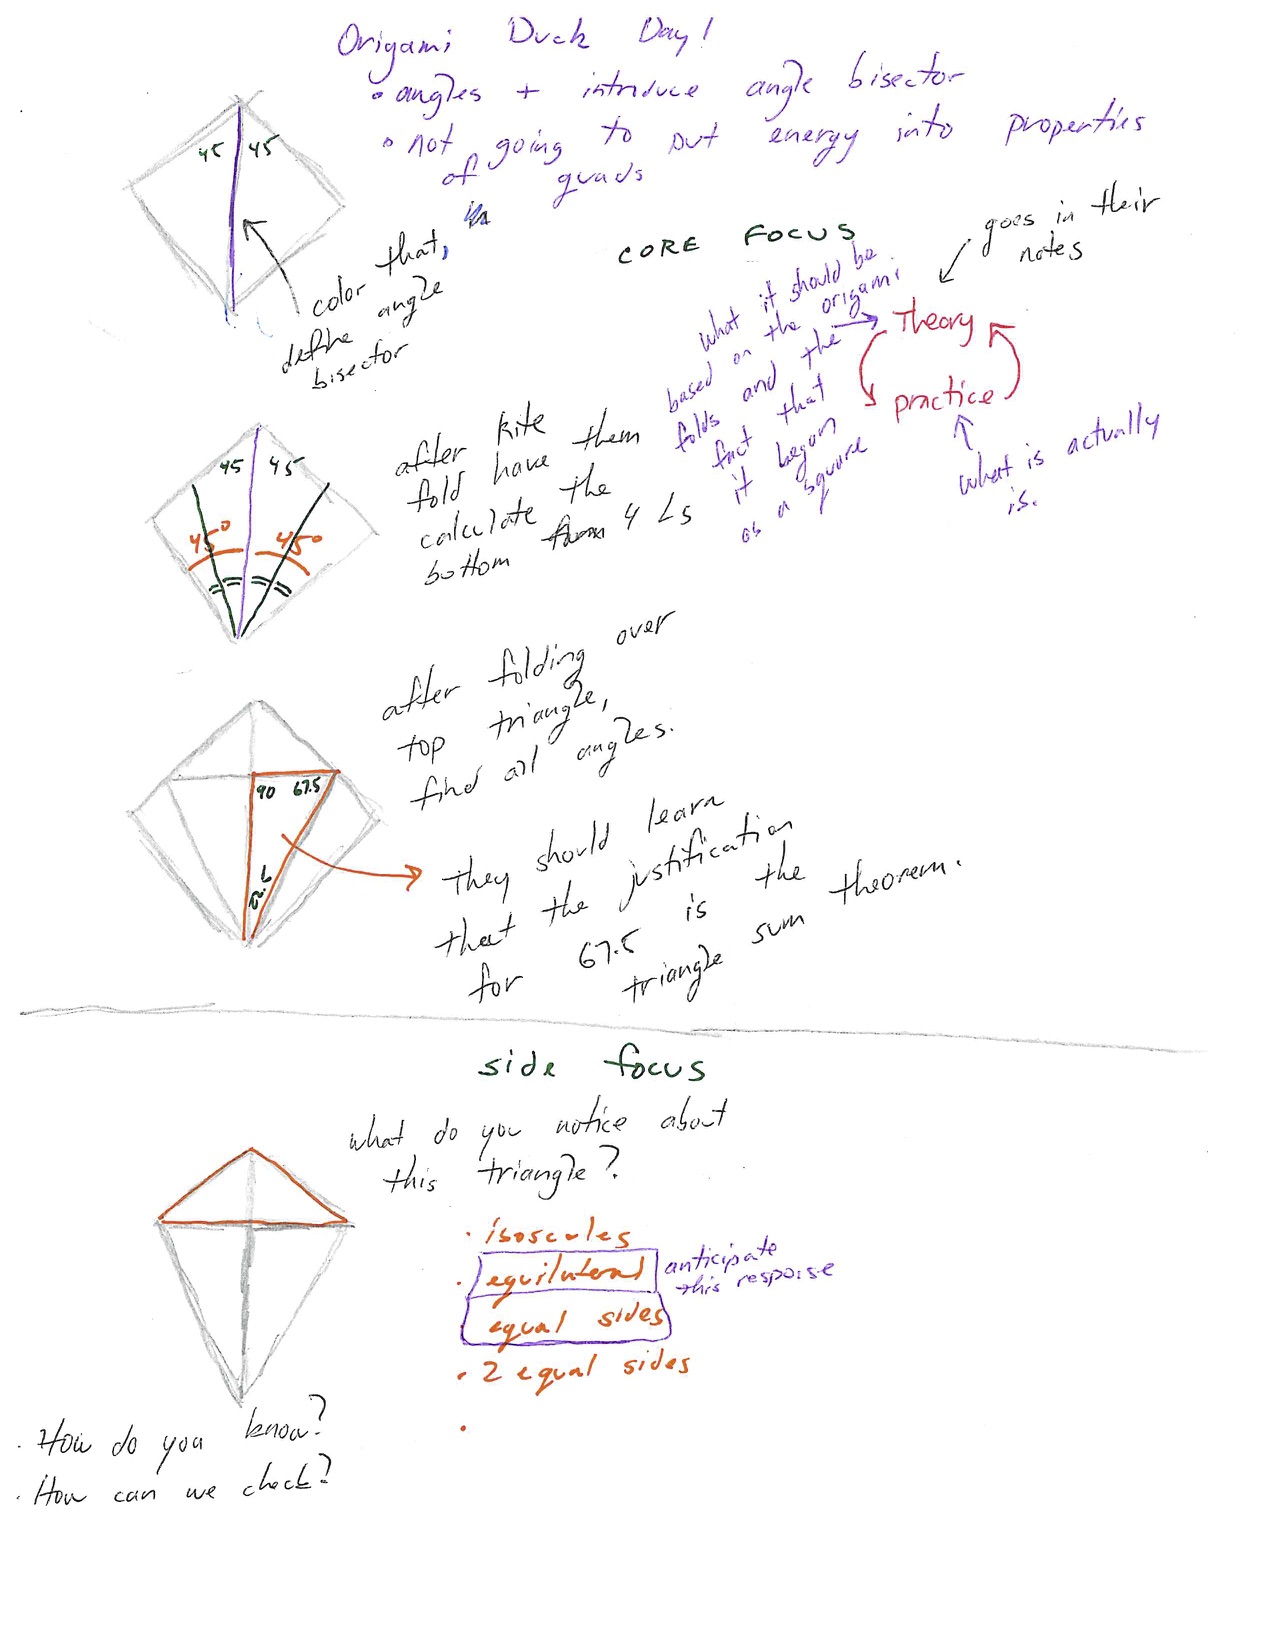
When I write out my plan I like to be very direct my main focus – but I also note any questions I want to pause on that aren’t part of my main content goal.  So in this case – my main goal is the angle bisector and angle measures, but you can see I have carved out a specific time when I am going to deviate from that and do a ‘what do you notice’ on the step when they first fold the kite.

Day 1:  Fold the duck and find all missing angles.  Not worrying about having to provide justifications (warrants) and notation.  I focus on introducing the angle bisector because ultimately they are going to be solving for angles and almost each one is specifically related to a bisecting.

As I show in my notes – I did pause after each bisecting and had them figure out what the resulting angles were and mark the angles as congruent directly on their origami model.

I gave them individual time to figure out the angles right there on the origami model.  Then I grouped them and they went to whiteboards, drew the model on the board and solved it in teams.  I had a couple of the folding patterns printed out to help them draw it.   Just drawing the fold patterns is a lesson in itself since they have to draw the best square they can, and then attempt to properly bisect the angle.  To draw a bisector you must understand a bisector.

Origami Duck Real Fold Lines

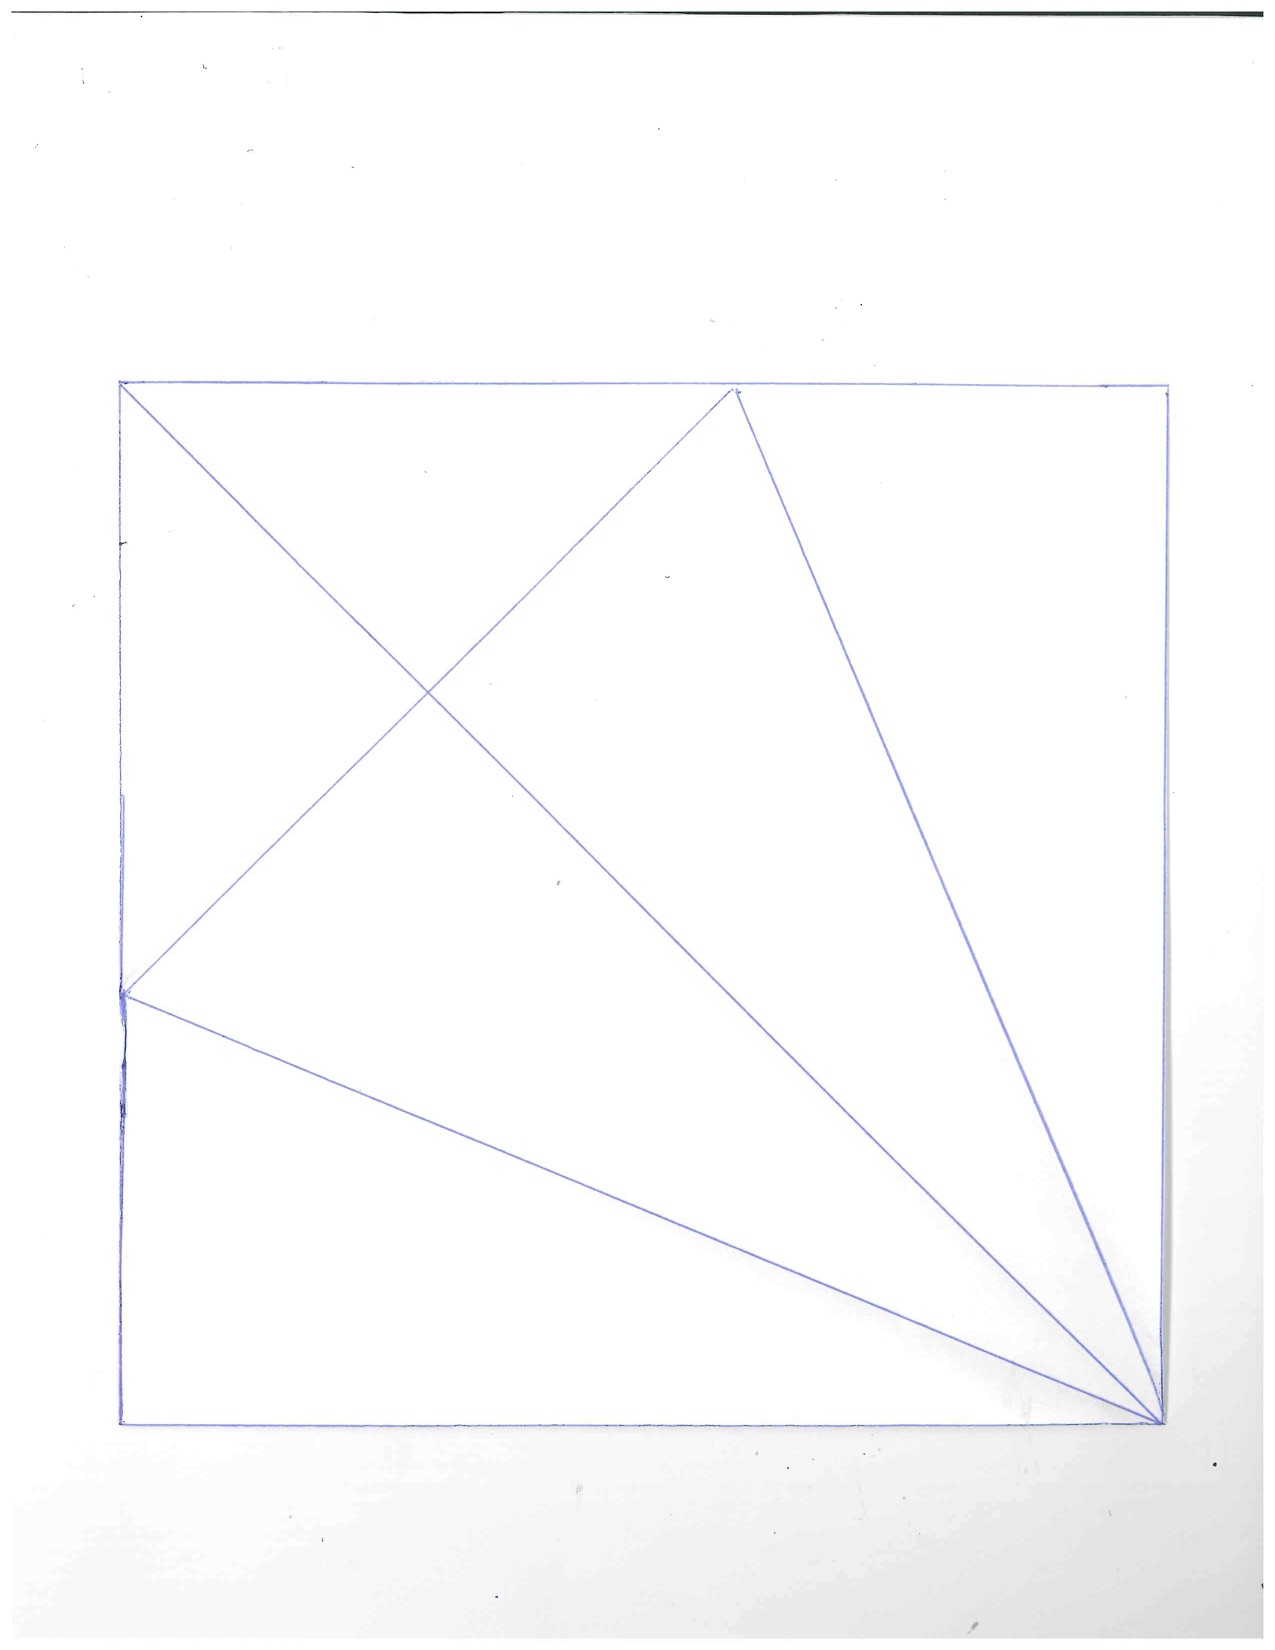
I intentionally used the folding pattern without labels because I didn’t want anything to distract from figuring out what every angle was.  But I suppose you could label it with points.

Day 2:  No folding, they just completed the Origami Duck worksheet.  I had them do it all at whiteboards, but having them work it on paper is cool too.  The idea is that now they are using proper notation, and needing to provide warrants for each claim (unlike day 1).  I used the worksheet from georigami.  I added the structure of CLAIM/WARRANT because that is the language we are using this year.

Activity origami duck

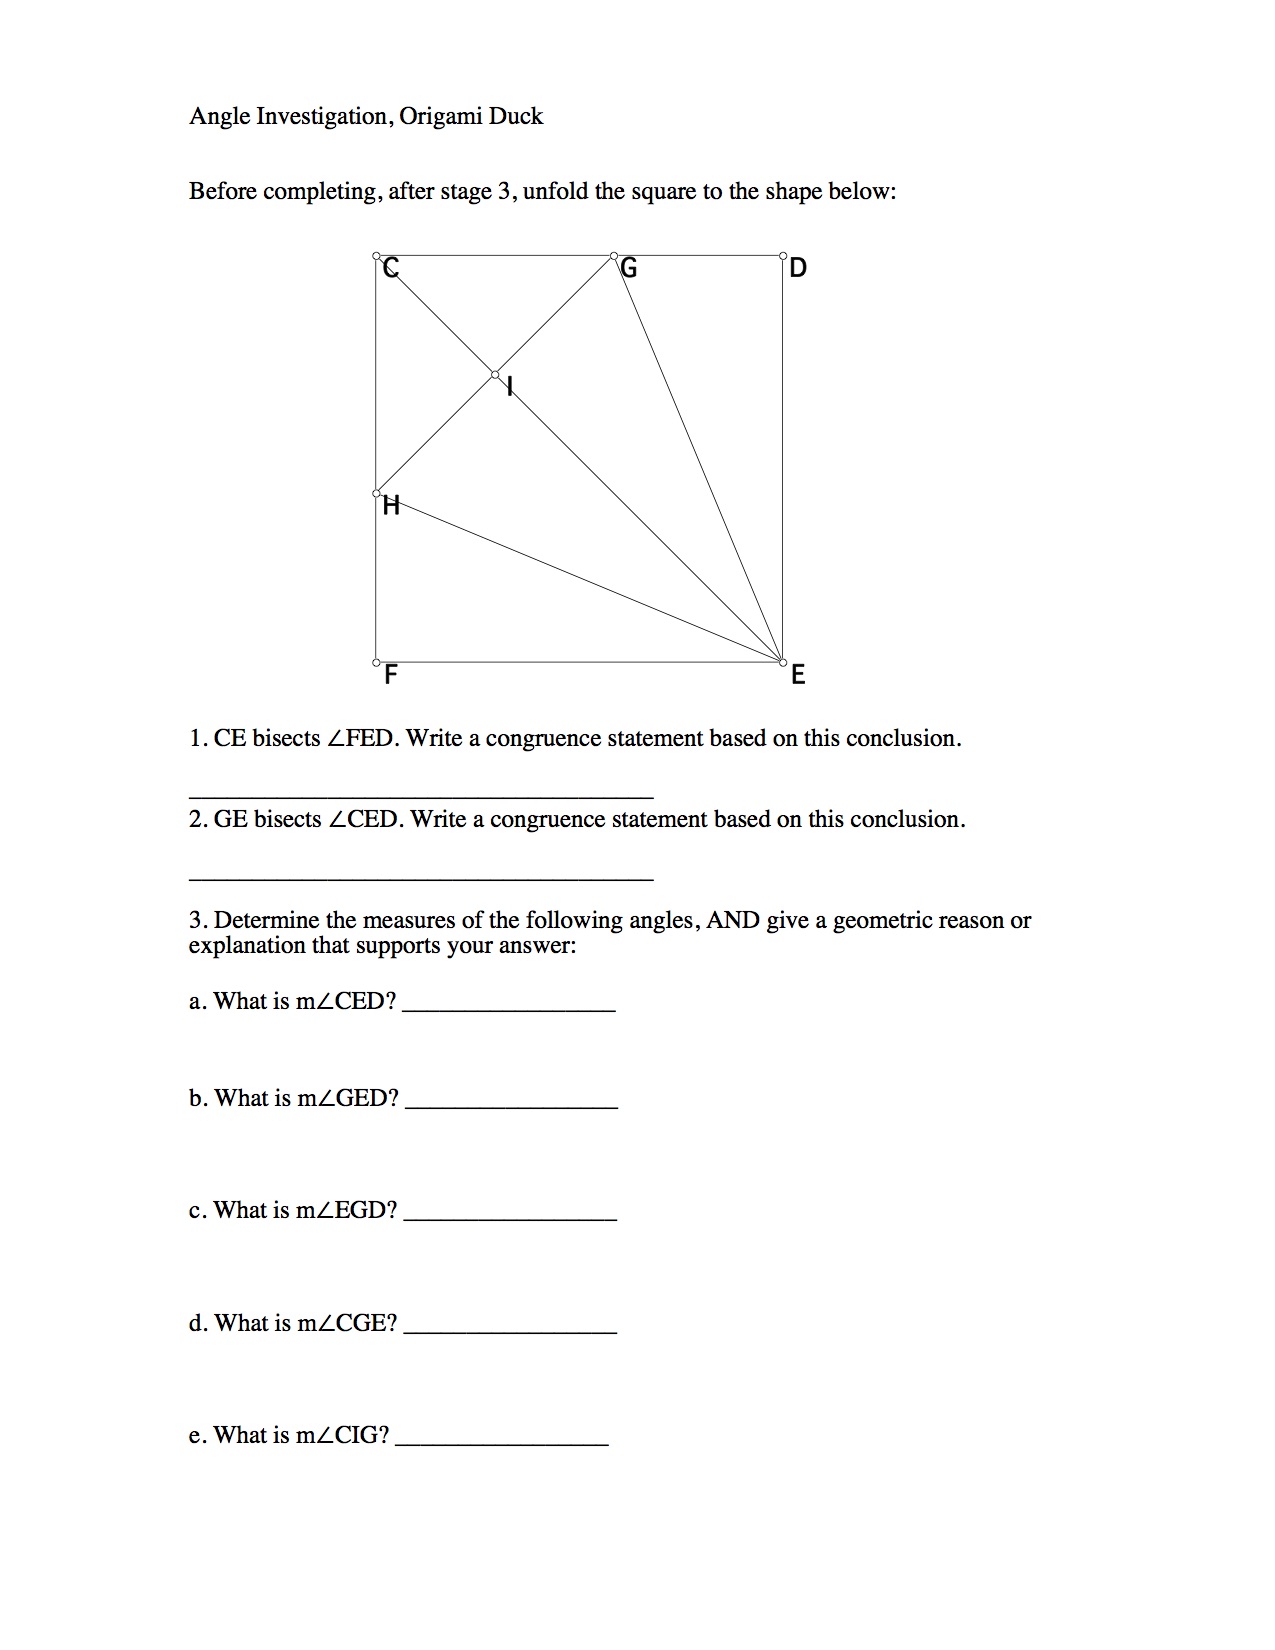
The reason I broke it into two days is because this is the 4th day of the year and I didn’t want the structure of CLAIM/WARRANT or the notation of defining angles to get in the way of their conversations about the value of each angle.  The second day they needed to find specific angles called out in the worksheet, and format it in a two column style with CLAIM / WARRANT.

ORCHESTRATING THE END OF THE CLASS

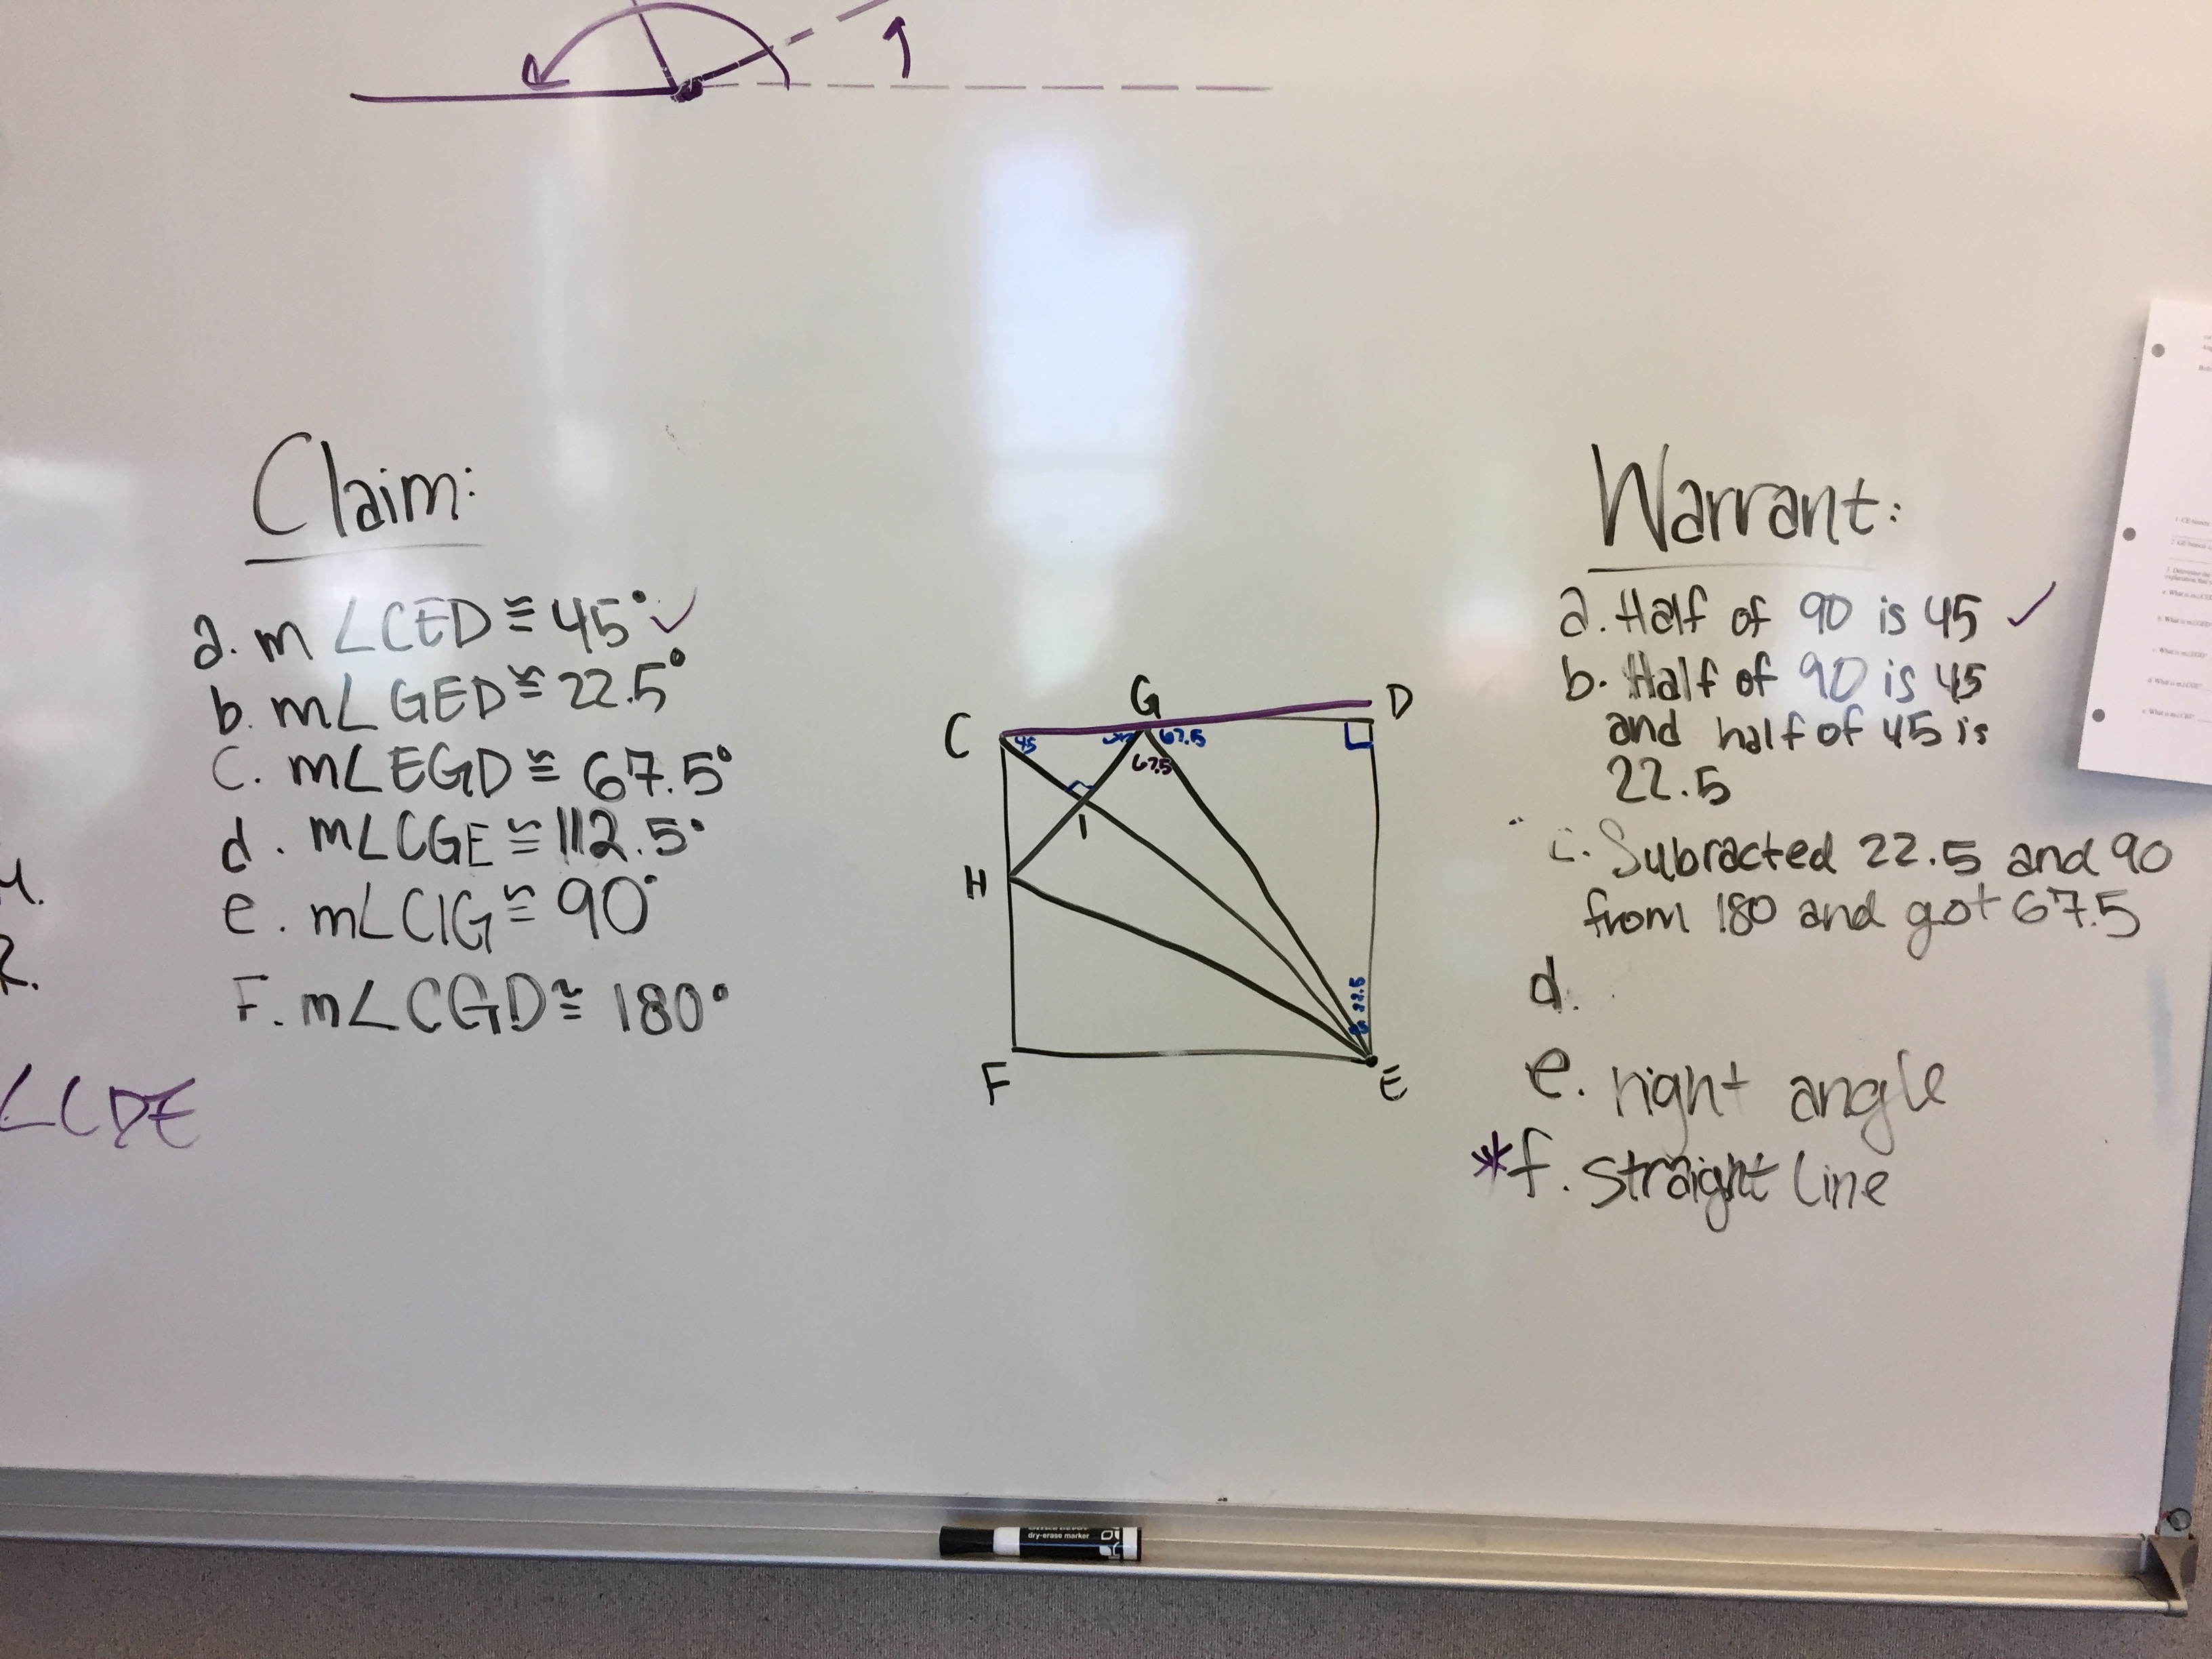
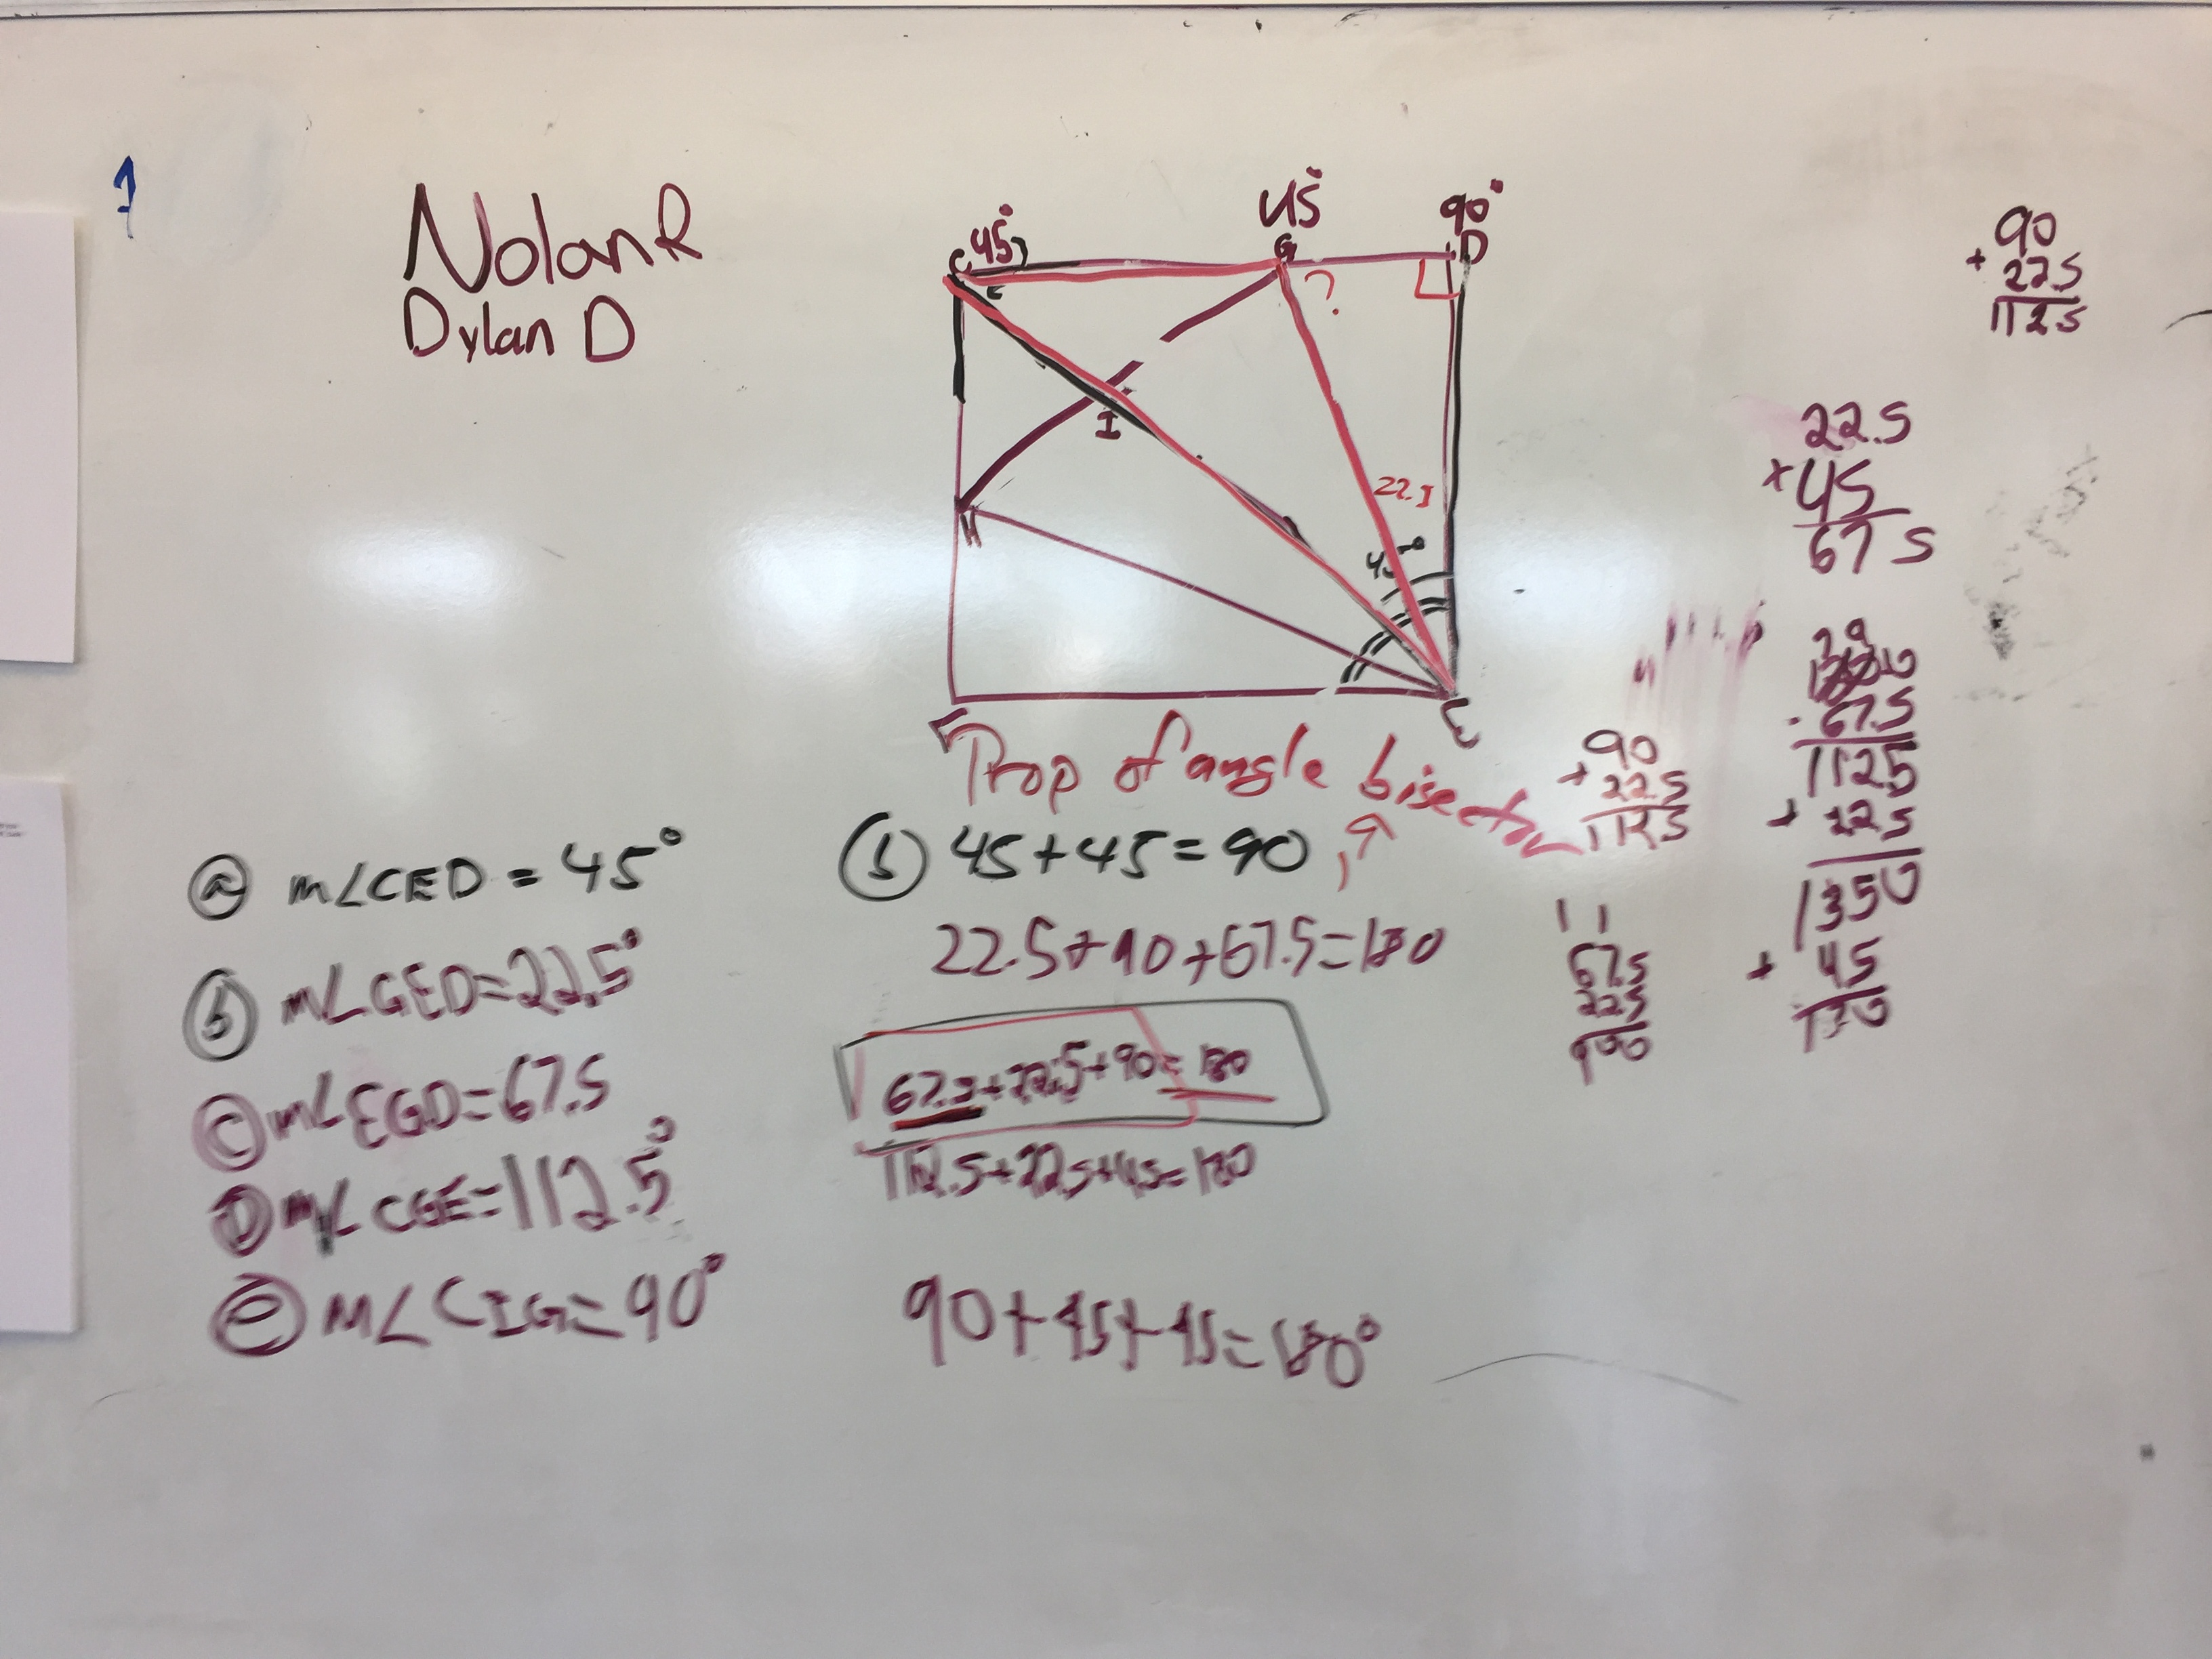
My goal at the end of the 2nd day is to take the students around the tour of the room and look at the justifications.  I am looking for a group whose warrants are only the algebra steps they used.  Then I’m looking for a group who might have described what they did in words – “we cut the 45 degree angle in half”.  I would like to find a group that justified their responses with theorems (property of a bisector, triangle sum theorem) but didn’t show algebraic steps.  And lastly a group that did both – like one of the ones pictured below.

For me this is early in the year, so while the students are working I’m letting them take the word “warrant” and have it mean whatever they want.  My goal is for them to walk away with this distinction in mind:

Is it one thing to say the reason the angle is 67.5 is because 180-90-22.5 = 67.5.  But why does that algebra produce the correct answer?  What do you say to the person who doesn’t understand what gives you the right to do that?  You need to do more than just show the algebra, you must quote the theorem that supports the steps.

Or put in less words

Oh, I need to justify my algebra steps.

THEORY VS. PRACTICE

You might have notice this diagram in my notes above:

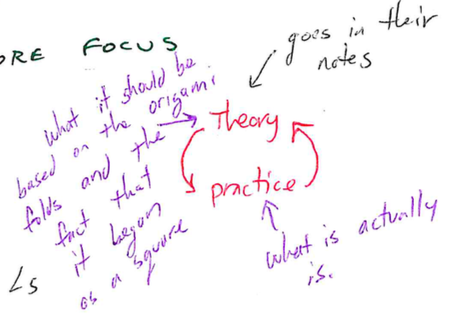
I have them put it in their notes.  It’s fundamental to my origami lessons.  Here’s why:  When you ask students to find the angles – is measuring the angles good enough?  My speech is that “theory” is what the angles should be – given that we started with a perfect square and did each origami fold perfectly.  They need to calculate angles based on “theory”.  Then I have them check their calculations by measuring what the angles actually are, which is the “practice”.  “There is always error in measurement” as Dave says.  So I don’t want them telling me their measurements and theory are identical.

At the end of the day the theory informs the practice and the practice informs the theory.  For example with the duck – the students might decide that on of those four congruent angles is 45 degrees.  But when they measure it they notice it is actually more like 22 degrees.  The reality of the angle provides insight into their calculation that they are not taking into consideration a bisector.

FOLDING HEADS UP

I didn’t pre-fold any models.  The duck is the first model I do and it has three inside reverse folds – so just be aware that they will find those difficult.  If I was to pre-fold I would pre-fold 8 models to where the neck is done but not the head.

Ok – that’s it.  It’s just a duck afterall.

Cheers!
– B


My Favorite Talking Point

If you first want an explanation of the Talking Point activity – click the following link:

Talking Points

Here’s my favorite talking point for developing the classroom culture for listening.  I have other favorite ones too 🙂

It’s impossible for other people to tell if you are listening

I would expect near 50% agree / disagree ratios.  I actually give out seven talking points for them to do but I only discuss the one above with the whole class.  Here are all seven that I use:

After we finish the activity I give them the following reflection prompt which does a nice job having the students confront that there are certain tells as to whether or not someone is listening:

Do you feel like you were being listened to?  Why?  Were you listening to others?  Do you think they knew you were listening?

Essentially, if you think you were being listened to – how do you know?  What were the signs?  If you think you weren’t being listened – why do you think that?

The conclusion at the end is that just listening is not enough.  You also must show the speaker you are listening.  We discuss how it is deflating to speak to a room when lot’s of people are looking down (unless it’s tmc of course).  Even though you may be listening while you are looking down, we in this class do our best to turn and face the speaker and make eye contact.

This year I’m having students stand when they tell me their tally and when I ask them for one the groups arguments.  So I get to further drive how the important of turning to face the speaker because when they are standing everyone can see them.

I don’t recall where the list I pulled these from is located – but I know they were definitely from @cheesemonkeysf.

Cheers!
– B

Golden Ratio & The Human Face Activity

The study of the human face is great place for the golden ratio, and thus also similarity.  As has often been the case lately – I need to pause and say that this activity was created my incredible colleague Dave Casey who is tour de force of resources, ideas, and inspiration in the math-art intersection.

This activity fits a human head into a primary rectangle (the rectangle that encloses the shape) that is a golden rectangle.  I’ve done this activity before exactly as the worksheet lays out.  I did the origami face above just for fun a couple days ago and enjoyed it a lot.  I liked that it didn’t have any lines to erase and had a cool, kind of 3D look to it.  But the worksheet itself doesn’t talk about folding paper, that’s an element I added.  Here are a couple things you need to consider for adding that element:

  • Mountain fold the vertical fold in the middle of the face.  This line is not in the worksheet but it allows the nose line to come out a little bit. (mountain folds are when you fold away from you and it looks like a mountain, valley folds are when you fold towards yourself and it looks like a valley)
  • Alternate mountain and valley folds.  So in the image above the eye line is a valley fold, so the nose is a mountain fold, and the mouth is a valley fold.
  • I used the height of a regular piece of 8.5X11 printer paper.  So the first fold is actually the one needed to make the paper into a golden rectangle.  This is also the first thinking moment as the students need to figure out how wide the paper needs to be if the height is 28 cm (or 11in).  It could be fun to also initially play on intuition and just hold up a piece of paper and ask them if they think it is too narrow, too wide, or just perfect to fit a human face.
  • During the folding I was thinking of the forehead line and mouth line as a reflection of each other.  Origami is great for folding reflections and it opens another avenue for review during this lesson.

You might do the face with folding first and then have them do the activity exactly as defined in the worksheet.  Notice the high ceiling element where they make slight changes the ratios of the primary rectangles they fit the face into, and see how they effect the human face.  Here’s the results:

The Goods:

Here are pdf’s and Word files for it:

Ratio Faces (pdf)

Ratio Faces (doc)

The Hook & The Spiral:

Dave has a great way to introduce this activity that turns the correct proportions into a surprise ending and also brings in stats.  He guides the students to drawing a golden rectangle for them to use as a primary rectangle, and then has them sketch a face inside it.  Here’s the one I drew when I first observed Dave do the lesson:

Then he has them measure the ratio of the height of the face, to the eye height.  He collects all the data and has the students make a box plot.  The correct answer of about 0.5 is usually outside the box!  People always put the eyes too high on the face.  It’s cool because now when you tell them the correct ratio is 0.5 and the eyes are pretty much in the middle the students get this ‘my intuition was wrong, I just learned something, that’s interesting, give me more’ moment.

The Inspiration:

We’ll have to ask Dave for the inspiration to the lesson itself, but my inspiration for wanting to add origami to it comes from this clip from the documentary “Between the Folds” where the Eric Joisel quickly folds the rough form of the human face.  This lesson doesn’t achieve the form like Eric was able to do but watching him got me playing around with the idea of proportion and origami.  I would still love to have an origami face lesson more similar to what Eric created.  Any one?

I did learn some sad news while looking for the clip – Eric Joisel passed away in 2010.  Looks like the world lost a true artist.  Here is the New York Times article on his passing.

salute,
-B